Easiest way to set up Google Tag Manager in Shopify
If you’ve worked in digital marketing or launched an online campaign, chances are you’ve worked with marketing tags (or pixels).
A marketing tag is an element that is included in webpages or platforms that you want to measure. It’s a small piece of code that is inserted in the source code that will allow you to refine analyses by categorizing events, page visits and visitors. It’s an essential part in gathering the data you’ll need to make important business decisions.
Tags are very important for most business owners and marketers when it comes to determining which campaigns are delivering results.
In this article we’ll explore the implementation of GTM in your Shopify store, how to test your tags and alternatives to manual implementation.
What is Google Tag Manager?
Google Tag Manager is a tag management system that allows you to easily implement and update your marketing tags. You no longer have to put code snippets directly into your pages. All your marketing tags will be managed by Google Tag Manager in a central place.
Why do I need Google Tag Manager?
Data is power. You can use tags to gather the data you will need to make critical business decisions – in real-time. When you have Google Tag Manager installed on your Shopify store, for example, you can track your marketing efforts, your customers’ browsing and shopping behavior, identify your best-performing or under-performing products and repeat purchases. You can also readily determine your customer lifetime value and adjust your marketing efforts accordingly.
You could, of course, implement your marketing tags directly into your pages but with Google Tag Manager is so much easier. The benefits include:
Central tag management
All marketing tags are created or updated in one central place. You don't have to hire a developer to dig into your Shopify store and update your template files.
Testing
When it comes to troubleshooting and fixing your tags, Google Tag Manager has a PREVIEW mode, where you can clearly see which tags are fired and what data is pushed with these tags.
Versioning
When you make changes to your tags, and then publish your GTM container, a new version of this container is created. You can easily roll back if you have to.
Built-in tags
Google Tag Manager has a number of built-in tags for Universal Analytics, GA4, Google Ads conversions and remarketing, and even a Community Template Gallery with hundreds of tags. This means that even with little or no coding skills, a marketer can implement tags really easily.
User Permissions
Google Tag Manager allows you to give different levels of access to different users to manage your marketing tags. This is really convenient if you want to provide access to internal or external teams to manage your tags.
Why use Google Tag Manager on Shopify?
Google Tag Manager is a powerful tool, which can be used to manage all your marketing tags. Tagging is a complex and labor-intensive process. Developers need to manually set up tags to all your pages, from the first visit to the thank you page and the form submissions. With Google Tag Manager this process is way more streamlined and organized.
How do I integrate Google Tag Manager into Shopify?
Unfortunately Shopify does not have a native Google Tag Manager integration. In order to do this, you can either manually add the GTM code snippets in your theme, or you can use Easy Tag - GTM & Data Layer app which is 1-click GTM integration for your Shopify store.
How to install Google Tag Manager in Shopify
Now that you are sold on the idea of using Google Tag Manager, let’s get into the details of how to install it.
Start by registering a Google Tag Manager account and a container. A container is essential in order to integrate with Google Tag Manager, but don’t worry: it’s a simple process.
- Go to https://tagmanager.google.com/ and login with your Google Account
- Create a new account and fill in your “Account Name” and “Country”
- In the “Container Setup” section fill in your container name (usually your Shopify store domain name “myshop.com”)
- For “Target platform”, select “Web”
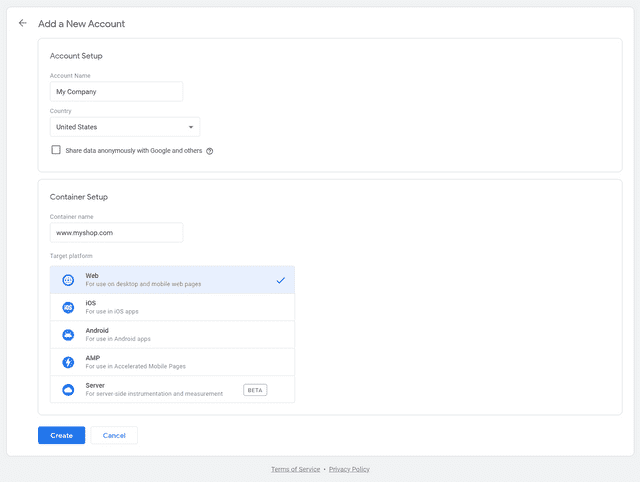
- Click on the “Create” button. Your GTM container has been created and looks like this:
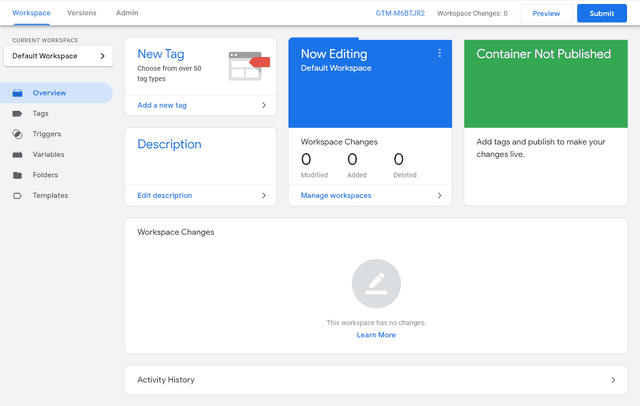
- The final step is to publish your container. Click on the “Submit” button at the top right corner. Fill in “Init” for “Version Name” and click the “Publish” button. This will create an initial version for your container, which will allow us to preview it later.
How To Manually Install GTM code for Shopify
Once you’ve installed Google Tag Manager (GTM), you are well on your way.
- Get your Google Tag Manager code snippet. You can find these snippets by clicking Admin and then clicking Install Google Tag Manager.
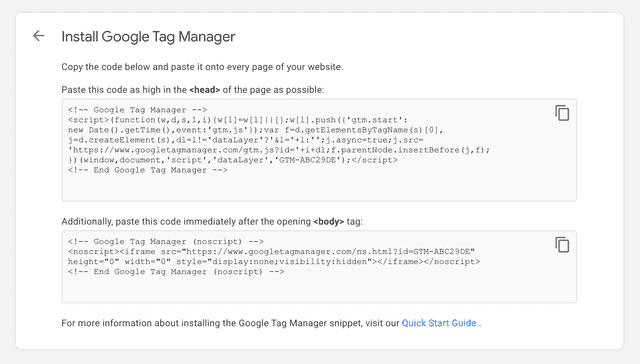
- Go to your Google Tag Manager container and copy the first code snippet
- Update your Shopify theme by logging into your Shopify store admin panel. Click on “Themes” under “Online Store” in the left navigation menu.
- Click on the “Actions” button in “Current theme” section and then click “Edit code”
- Open your theme.liquid file and paste the code right after the opening <head> tag. You should do the same in your checkout.liquid file if you're on a Shopify Plus plan, and if you want to add Google Tag Manager to your checkout pages.
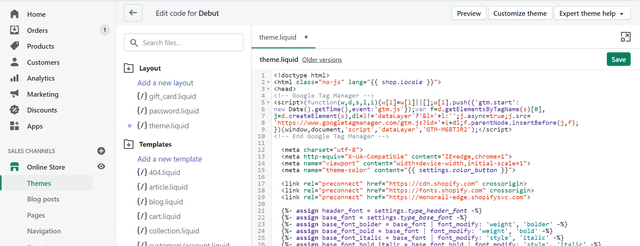
- Then copy the second code snippet and paste it right after the opening <body> tag in theme.liquid file. Again, if you're on a Shopify Plus plan, and if you want to add Google Tag Manager to your checkout pages, you should do the same in your checkout.liquid file.
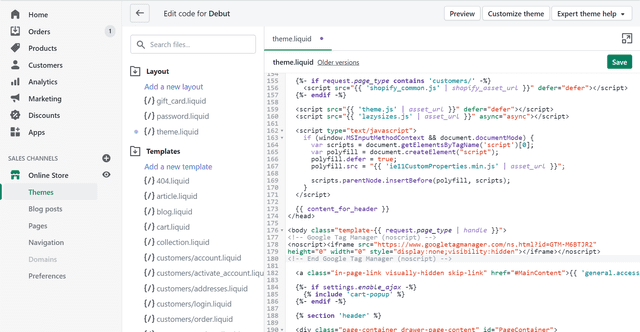
- Finally, save the file.
Now install the Google Tag Manager code snippet on your order “Thank You” page. We are doing this, because this is the place where we do conversion tracking in Shopify.
- Go to Settings then Checkout.
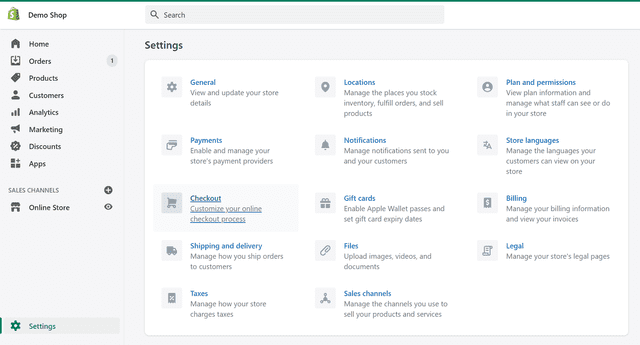
- Scroll down to “Additional scripts” in the “Order processing” section
- Paste your first GTM snippet in the text box and click “Save” in the top menu
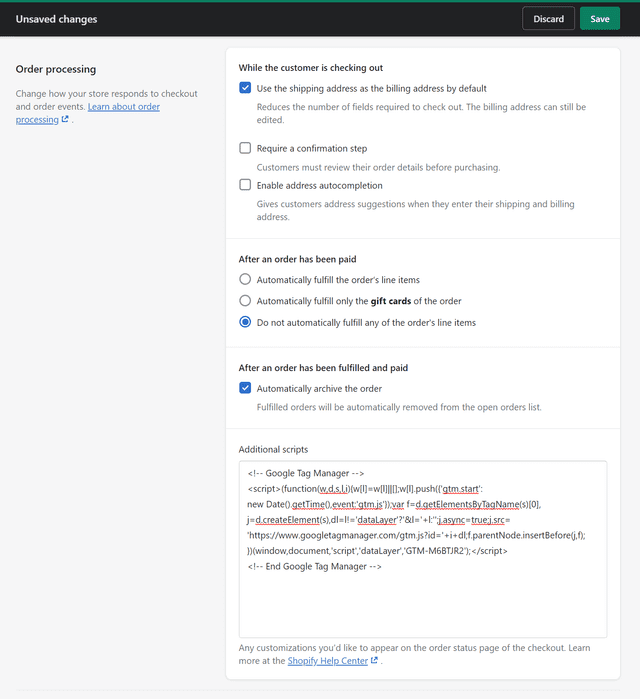
Now Google Tag Manager is installed and you can verify your setup.
How to Verify your Google Tag Manager integration
Install Google Tag Assistant chrome extension.
- Go to Google Tag Assistant and click on “Add to Chrome” button.
- Visit your shop and click on the Google Tag Assistant icon. Then click the “Enable” button.
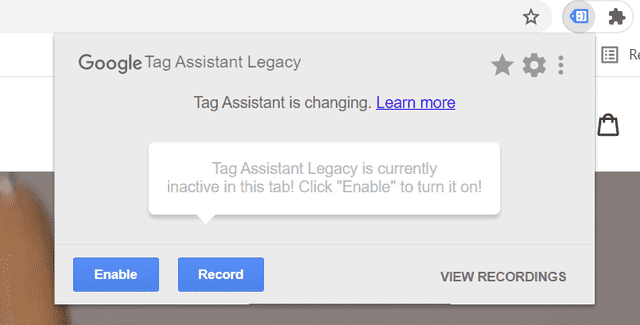
- Reload your browser. You should see Google Tag Manager in green, as below.
Now let’s go to Google Tag Manager and create a simple tag to actually see tags are firing successfully!
- Go to you Google Tag Manager container and click “Tags” from the left navigation menu.
- Click on the “New” button to create a new tag and name it “Test Tag - All Pages”
- Click on “Tag configuration” and select “Google Analytics: Universal Analytics”
- For "Track Type" select "Event" and fill in Category, Action and Label.
- Fill in your Google Analytics UA code (ex.: UA-1234567-8)
- Click on “Triggering” and select “All Pages” from the list. Click “Save”.
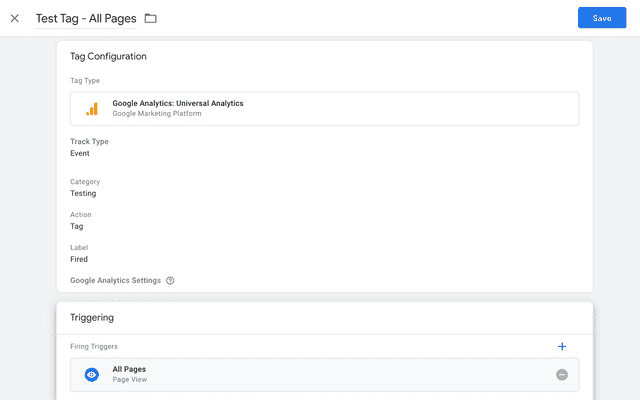
- Now click on the “Preview” button. This will open Tag Assistant in a new tab.
- Fill in your shop URL (ex.: https://myshop.com) and click “Start”. This will load your shop in another new tab.
- You should be able to see the tag fired successfully in the “Tag Assistant” tab
- Go to your “Google Analytics” account and look at your “Realtime/Events” report.
Don’t want to go the manual route? Read this first.
That was pretty easy…but it takes a LONG time. Setting up Google Tag Manager is pretty time consuming, and it can be hard for novices to fix errors if something goes wrong. If you don’t want to go the manual route, or if you require a data layer for your Shopify store, you can install Easy Tag - GTM & Data Layer app for Shopify.
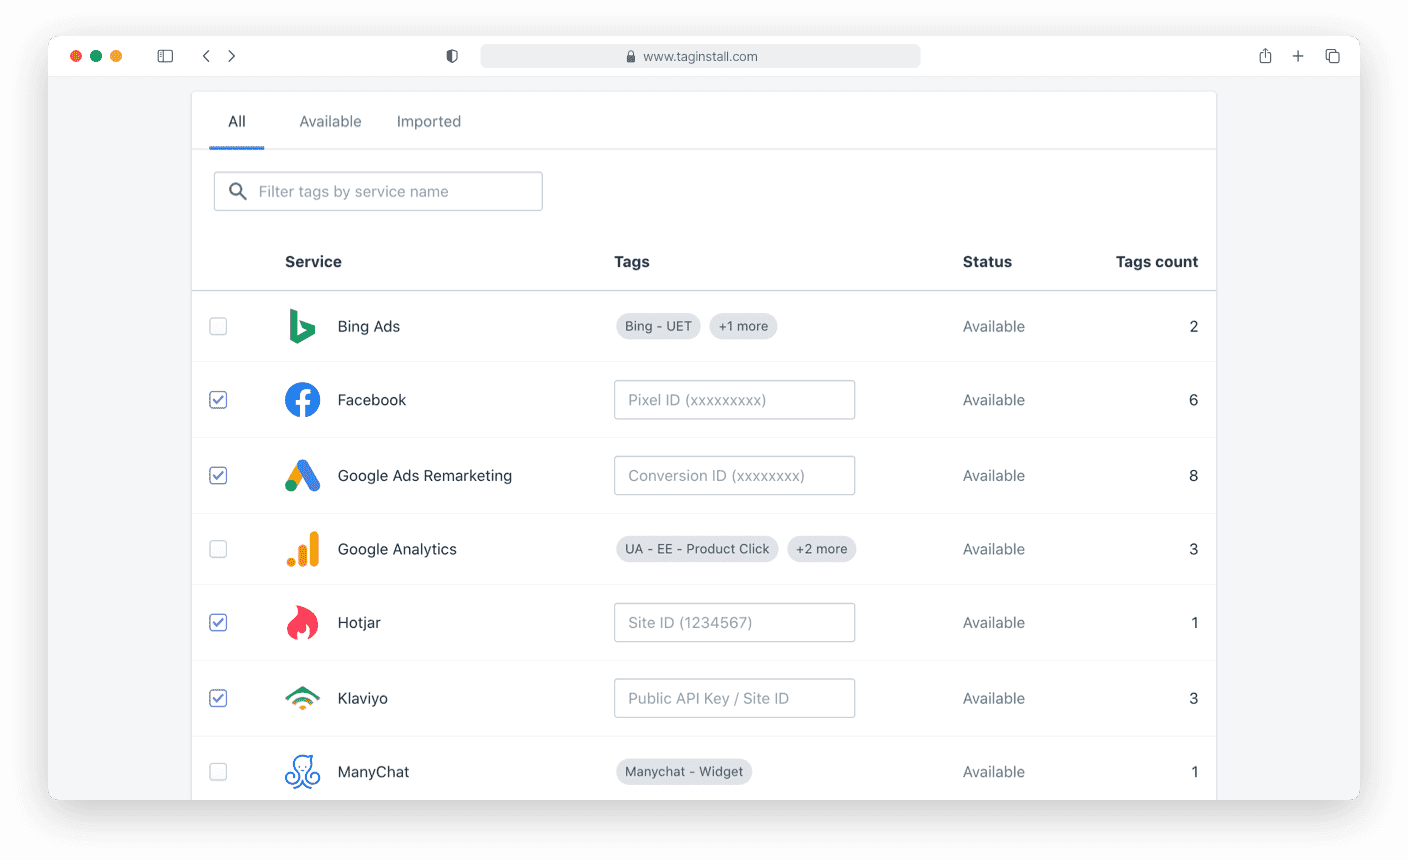
Easy Tag is a Shopify app for Google Tag Manager integration that does the hard work for you, so that you can focus on the tasks that matter. Plus, it comes with 60+ ready-made tags so that you have an instant head start.
Why marketers use Easy Tag
Easy Tag app makes implementing Google Tag Manager simple, fast, and accurate. Marketers love Easy Tag as it ensures the data is gathered and reported correctly, taking the guesswork out of marketing. You don’t need dev skills to install or manage it.
If you have your own ecommerce store or business using Shopify, this app will help you strategize in ways you’ve never imagined before, because you can base your decisions on accurate customer data. You’ll never be out of the loop!
Other benefits include:
- Quick & Easy Installation: Get started right away!
- Improved data accuracy: No more typos or copy and paste errors
- Free Technical Support: The Easy Tag team is on standby to help you
- Optimized for speed: Quick deployment and quick results to save you time and money
- Optional CCPA/GDPR compliance
- Server-side tagging
- Google Analytics 4 (GA4) support
What you get with Easy Tag - GTM & Data Layer
Easy Tag is a comprehensive solution that comes with everything you need to get up and running with Google Tag Manager. This includes:
- Google Tag Manager installation
- Pre-built Data Layer
- Over 60 ready-made tags
Easy Tag provides multiple marketing channels implementations, including:
- Google Analytics (GA4)
- Google Analytics (Universal + Enhanced E-commerce)
- Google Ads Conversions
- Google Ads Remarketing
- Snapchat
- Klaviyo
- Hotjar
- ManyChat
- Bing Ads
- TikTok
…and many, many more!
FAQ
I’d like to pass transaction data to Google Ads. Can I create a data layer to pull in the different values?
Shopify does not provide a data layer. Again, it’s up to you to add it manually (which is out of the scope of this article) or you can use Easy Tag - GTM & Data Layer app to handle it for you.
Can I add Google Tag Manager to Shopify checkout?
You can add Google Tag Manager to your checkout pages only if you are on a Shopify Plus plan. There are some workarounds, but it mainly depends on what you want to track. Reach out for more details.
Should I install Google Analytics with GTM on Shopify?
Google Tag Manager is a great way of implementing Google Analytics, and you can definitely do it, but I would advise you to keep the built-in Shopify Universal Analytics implementation. You can track additional events in Google Tag Manager though – e.g. if you want to track video playback, or scroll depth or even time on page.
Should I install Facebook Pixel with GTM on Shopify?
I would strongly suggest to keep the default Shopify implementation with Facebook app, unless you have a custom tagging plan.
Shopify & Google Tag Manager: Final thoughts
Google Tag Manager has so many benefits for e-commerce businesses running on Shopify, but implementing it is tricky when you have to do it manually. Automating it via Easy Tag will save you hundreds if not thousands of hours, errors and frustration.
Feel free to reach out to us for more information.
Try Easy Tag today.
Pre-built Data Layer for Google Tag Manager & 60+ marketing tags.
